Node-OPCUA goes PubSub - Episode 1
Node-OPCUA goes PubSub ! Episode 1
That’s it! NodeOPCUA now supports PubSub as per Part 14 of the official OPCUA specifications.
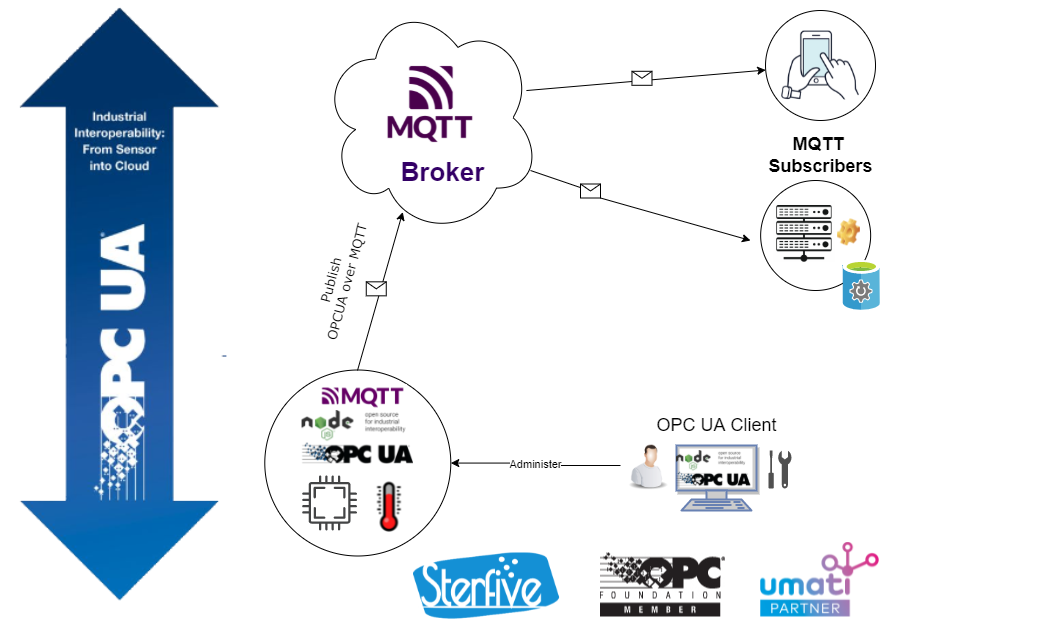
In this article, we will extend an existing OPC-UA Server. Then we will turn it into a PubSub publisher that streams its sensor values to an external MQTT broker. A scenario where IoT edge devices have to publish data to the cloud for data analysis.
If you are already familiar with Node-OPCUA programming, you already know how to create a simple OPCUA Server. You can do this in 3 easy steps, assuming that you have already installed NodeJS on your computer.
Let’s create a NodeJs project:
mkdir my-publishing-opcua-server
cd  my-publishing-opcua-server
npm init -y
npm install node-opcua
Now let’s edit our server.js javascript file:
the server
const { OPCUAServer } = require("node-opcua");
_"some additional imports"

(async()=>{
    try {
        const server = new OPCUAServer({
            port: 26543
        });

        await server.initialize();

        _"add a temperature sensor"

        _"enable pub-sub service"

        await server.start();
        console.log("server started at ", server.getEndpointUrl());
    } catch(err) {
        console.log(err);
        process.exit(1);
    }
})();
_"constructing the configuration parameters"
add a temperature sensor
Let’s create a sensor with its temperature variables.
Here is the OPCUA model diagram that represents the sensor option.
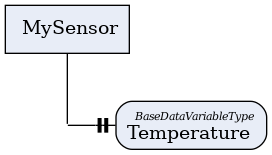
The javascript code to create the sensor instance is straightforward.
const namespace = server.engine.addressSpace.getOwnNamespace();

const sensor = namespace.addObject({
    browseName: "MySensor",
    organizedBy: server.engine.addressSpace.rootFolder.objects
});

const temperature = namespace.addVariable({
    browseName: "Temperature",
    nodeId: "s=Temperature",
    componentOf: sensor,
    dataType: "Double",
    value: { dataType: DataType.Double, value: 0 }
});

Note: The temperature variable nodeId has been set to `"ns=1;s=Temperature"`.


_"simulate the temperature variation."
simulate the temperature variation.
We do not have a physical sensor connected here. Instead, we can simulate a temperature variation by continuously changing the temperature with a sine wave.
setInterval(() => {
    const value = 19 + 5 * Math.sin(Date.now() / 10000) + Math.random()*0.2;
    temperature.setValueFromSource({ dataType: "Double", value });
}, 100);
run the server
We can now start the server and check the temperature value using an OPCUA client.
$ node server.js
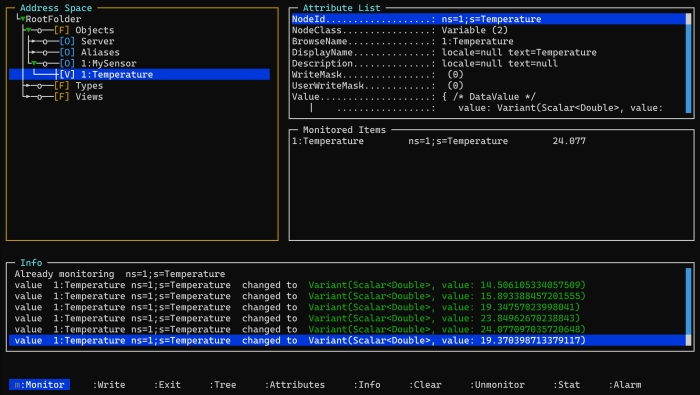
We can monitor the value by using
opcua-commander. This
lightweight OPC-UA client works in a console and does not require any
GUI framework.
$ npx -y opcua-commander -e opc.tcp://localhost:26543
We can now navigate to the variable
/RootFolder/Objects/MySensor/Temperature to watch it change.
Adding PUB SUB support
We now want to publish the temperature to an MQTT Brocker using the OPCUA PubSub specification. MQTT is a generic Publish-Subscribe protocol that allows data publishers to send almost any data type to any related subscriber. It is very flexible and convenient but doesn’t rely upon enforcing the data payload format that is conveyed to the subscriber. When using OPCUA over MQTT PUBSUB, the payload can be a JSON object or a binary blob. It is also structured in a standard way, with the header, metadata, rich content possibility message signature, and encryption. We will focus here on the OPCUA JSON payload. Two types of OPCUA JSON encoding are possible; The first can be used to be consumed by a generic (non-OPCUA) application. The second format contains more meta-information about the data type transmitted, such as the variant type. This format can use it to synchronize two OPCUA applications (client or server) over MQTT. (we will come back to this point in a future article.)
For the time being, let’s focus on adding the pubsub extension to our server, creating an MQTT JSON publisher, and creating a dataset writer that publishes our temperature value.
The initial step is required to add the node-opcua pubsub server extension.
We start by importing the node-opcua-pubsub-server and
node-opcua-pubsub-expander modules to our project.
$ npm install node-opcua-pubsub-server node-opcua-pubsub-expander
enable pub-sub service
We can now turn our OPCUA Server into a PubSub ready publisher by
calling the installPubSub utility. This function will do the
heavy-lifting of creating the PublishSubscribe object under the standard
Server object in the address space and bind all the necessary methods
and services.
Let’s add this after the await server.initialize(); of our server
code.
const configuration = getPubSubConfiguration();
console.log(configuration.toString());
//
await installPubSub(server, {
    configuration,
});
construct the configuration parameters
We reed to provide a set of parameters to fully configure the publisher and the associated dataset. A dataset describes the variables that will be published in the payload.
Let’s analyze the getPubSubConfiguration function that produces the
configuration object.
It returns a PubSubConfigurationDataType object containing the PubSub
configuration. The configufation describes the connection and the
published data set.
function getPubSubConfiguration()
{
  _"create the connection"
  const connection = createConnection();

  _"create the published dataset";
  const publishedDataSet = createPublishedDataSet();

  return new PubSubConfigurationDataType({
    connections: [connection],
    publishedDataSets: [publishedDataSet] });
}
The PubSubConfiguration describes the connections and the published
data sets.
A connection contains specific parameters regarding the PubSub transport protocol used and the various required parameters for the broker or the broadcasting system.
A published data set describes the payload content and provides the mapping information to link the published variables with the corresponding OPCUA variables in the server address space.
In our case, we need to define an OPCUA JSON MQTT connection and a single dataset.
create the connection
For a OPCUA MQTT JSON transport, we need to set the
transportProfileUri to Transport.MQTT_JSON.
The PubSubConnection contains the address of the MQTT broker we want
to publish to. For our demo, we will use the public demo broker offered
by Hivemq at "mqtt:broker.hivemq.com:1883".
function createConnection() {

    const mqttEndpoint = "mqtt:broker.hivemq.com:1883";

    _"create the writer group";
    const connection = new MyMqttJsonPubSubConnectionDataType({
        enabled: true,
        name: "Connection1",
        transportProfileUri: Transport.MQTT_JSON,
        address: {
            url: mqttEndpoint,
        },
        writerGroups: [writerGroup],
        readerGroups: []
    });
    return connection;
}
The PubSubConnection requires also one dataset writer definition to describe the MQTT topic of the datastream. It also contains additional flags that shape the meta-data that will be provided in each JSON message. A dataset writer needs to be assigned to a writer group.
create the writer group
The writer group contains extra parameters such as messageSettings and
transportSettings that are common to all dataset writers in this
group. It also contains information about the publishing interval. The
publishingInterval indicates the rate at which the JSON message will
be published to the broker.
_"create the dataset writer"

const writerGroup = {
    dataSetWriters: [dataSetWriter],
    enabled: true,
    publishingInterval: 1000,
    name: "WriterGroup1",
    messageSettings: {
        networkMessageContentMask: JsonNetworkMessageContentMask.PublisherId,
    },
    transportSettings: {
        requestedDeliveryGuarantee: BrokerTransportQualityOfService.AtMostOnce,
    },
};
create the dataset writer
The data set writer contains additional message setting parameters.
The dataSetName parameter indicates the name of the published data set
that produces the data to be sent.
The queueName parameters contains the mqtt topic we want to publish
to: stervfive-opcua-demo/json/data/temperature-sensor1 .
const dataSetWriter = {
    dataSetFieldContentMask: DataSetFieldContentMask.None,
    dataSetName: "PublishedDataSet1",
    dataSetWriterId: 1,
    enabled: true,
    name: "dataSetWriter1",
    messageSettings: {
        dataSetMessageContentMask:
            JsonDataSetMessageContentMask.DataSetWriterId |
            JsonDataSetMessageContentMask.MetaDataVersion,
    },
    transportSettings: {
        queueName: "stervfive-opcua-demo/json/data/temperature-sensor1",
    },
};
The dataSetName: "PublishedDataSet1" tells the data set to publish the
data that will be collected by the published data set named
PublishedDataSet1, defined below.
create the published dataset
The PublishedDataSet object describes the content of a payload message and what are the corresponding OPCUA variables.
The dataSetMetaData.fields array contains the list of properties
exposed in the payload message.
In our case, we have only one variable to expose. Let’s give it a
property name. I choose "Sensor.Temperature". We also need to specify
that this is a Double value.
The dataSetSource.publishedData array contains the same number of
element as in the dataSetMetaData.fields.
Each element of dataSetSource.publishedData is used to map the data
set property to the corresponding OPC-UA variable on the server address
space with the attributeId and publishedVariable parameters.
It also indicates the suggested sampling interval in the
samplingIntervalHint parameter.
In our case, the nodeId of the varaible to monitor is
"ns=1;s=Temperature"
function createPublishedDataSet() {
    const publishedDataSet = {
        name: "PublishedDataSet1",
        dataSetMetaData: {
            fields: [
                {
                    name: "Sensor.Temperature",
                    builtInType: DataType.Double,
                    dataType: resolveNodeId("Double"),
                },
            ],
        },
        dataSetSource: new PublishedDataItemsDataType({
            publishedData: [
                {
                    attributeId: AttributeIds.Value,
                    samplingIntervalHint: 1000,
                    publishedVariable: `ns=1;s=Temperature`,
                },
            ],
        }),
    };
    return publishedDataSet;
}
starting the server
We can start the server
$ npx node server.js
Subscribing to the OPCUA PubSub topic
We can now verify that a MQTT client can subscribe to the published data. Let visit the HiveMQ’s public WebSocket client page at http://www.hivemq.com/demos/websocket-client/ .
and add a topic subscription to our topic:
stervfive-opcua-demo/json/data/temperature-sensor1.
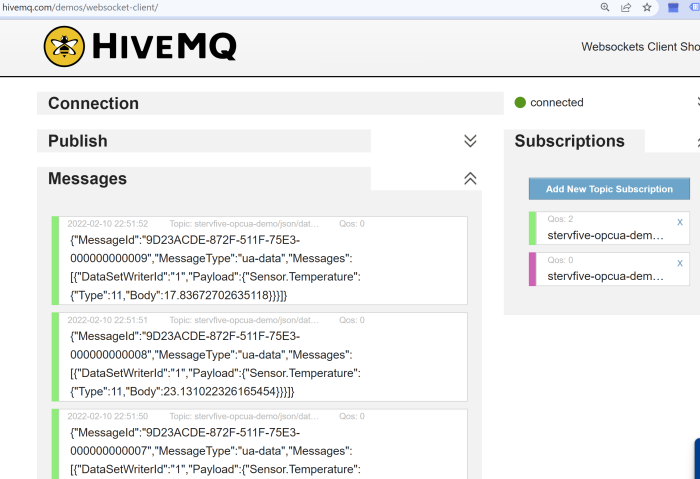
Here we go ! the data stream is up and running. It’s time to collect the flow of data to feed our data lake and produce the data we need for your predictive maintenance application.
Conclusion
We have demonstrated how to add PubSUb support to a node-opcua server application and created a data stream that publishes a sensor value to an MQTT broker by using a standardized OPCUA JSON payload.
Our next article will explore the PublishSubscribe object in the
server address space. This object exposes the PubSub configuration of
the OPC-UA server. It’s used to modify the connection parameters or the
payload shape; dynamically, while the server is running.
The node-opcua-pubsub-* modules are available from Sterfive.
references:
- the “Node-OPCUA by example” book
- @sterfive/node-opcua-pubsub
- HiveMQ’s public demo MQTT broker
- HiveMQ public WebClient
- Eclipse Mosquitto
- Gyphy